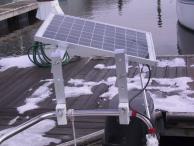
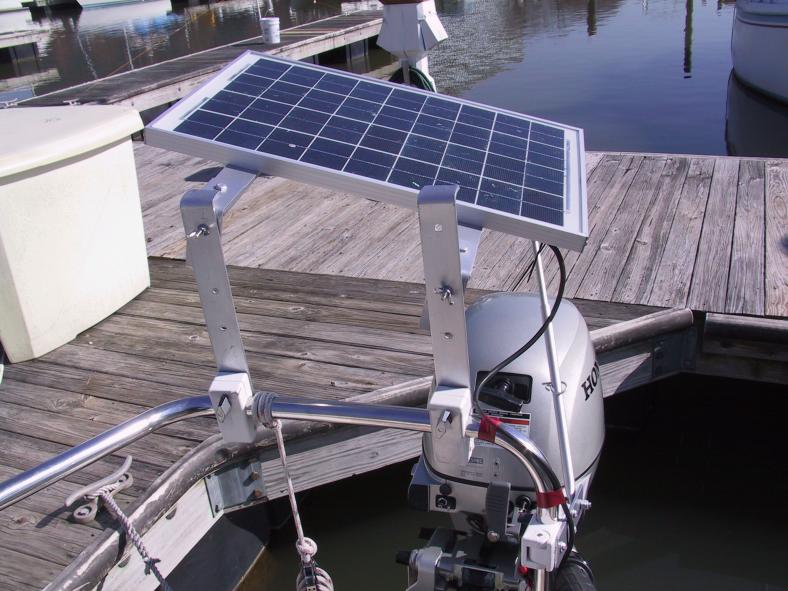
There are pro/con to each of the most popular solar panel types: Rigid, flexible and a hybrid between the two. The rigid panels (ie. Kyocera, Siemans/Shell, BP) have glass tops and aluminum support structure. These put out the most watts/amps per sq inch of panel. They are not as versatile for mounting/best to mount permanently and that is usually in a spot that is not going to be in the way (ie. stern rail). 25 yr warranties are common but sometimes the smaller panels come w/10 yr warranties. Flexible panels (ie. Unisolar) are more versatile in that they are very thin(ie. 1/8") and can be walked on and rolled up/tucked away when desired. 3 yr warranties are common. Some have a 5 yr warranty. The semi-flexible panels (ie. Solara) have equal watts/amps per sq inch to the rigids, can be formed to a ~5 degree slope/contour for decks, approx 1/8" thick w/aluminum backing matl, walked on but cannot be rolled up. They could be mounted permanently off the stern rail but woiuld need a support structure since the aluminum backing matl is not by itself a support structure. These generally have a 10 yr warranty. I went with the Kyocera 20 Watt Rigid Panel, 1.2 amps/hr, 20"X 14"
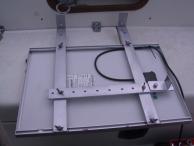
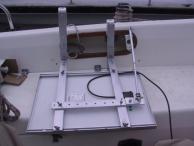
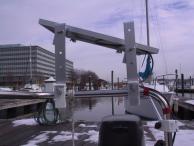
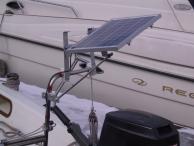
I decided to mount off the stern rail so that the panel could be left there mostly permanently but with capability of easy removal, if so desired. Looking at other installation panel mounts, I noted some undesirable features that I wanted to solve with my mounting. I wanted a panel mount that allowed for tilting the panel up and down and to either side. I also did not want the panel mount to interfere with use of the ladder, motor or resting my back against the stern rail. As a result, I decided to make my own mounts with aluminum plate matl purchased thru a mail order supplier:
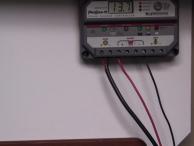
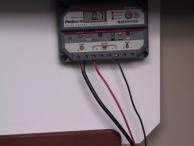
Northern Arizona Wind & Sun http://store.solar-electric.com for the solar panel and Morningstar 15M Pro Controller
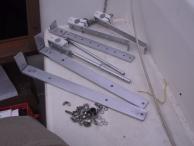
MetalsDepot.com for the Aluminum plate material 1/8" thick; 3/8" & 1/2" Alum rod matl.
West Marine/Boat US for the plastic stern rail hinge supports
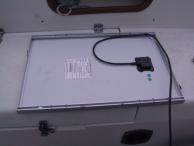
The photos show the underside of the panel with channel slots for sliding a bolt head. This is how the mount is then attached. I used a hack saw for cutting the plate material and a bench vise for the bends, Self locking nuts were used for the connections that would rarely need to be opened and wing nuts and lock washers for the other support parts. Although I sail in freshwater (Potomac River), Aluminum plate material will still disintegrate over time and so best to use anodized Aluminum. The plate matl was not anodized and so I purchased industrial grade Rustoleum primer and enamel spray from Home Depot. 2 coats of primer and believe 3 coats of the enamel was sprayed on all parts. The bolts that slide thru the panel underside channel were also spray coated.
These photos show the finished installation. The panel can be positioned in the horizontal or tilted at two different angle positions to the port or starboard as well as tilted up facing toward the bow or down facing toward the rear. This feature is desireable since when the boat is left at the finger slip, the peak amps can only be attained if the panel is perpendicular to the sun. My panel as shown is tilted at the middle position which is less than 90 degrees to the sun and so I do not get peak amps in present position. I would have to loosen the wing nuts and tilt it to the lower position to get peak amps but I prefer leaving it mostly in the position shown mostly for aesthetic reasons. As a result, instead of getting the 1.2 amps max, I get approximately .8 amps/hr on full sun days.
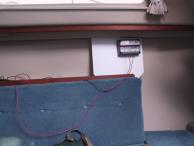
I decided to mount the controller on a polymer board wedged onto the starboard rear shelf. The easiest and fastest hookup was utilizing a 12 volt accessory plug which thru the battery switch allows me to charge both or 1 battery at a time. I eventually will connect the wires directly to the battery negative and the battery switch. The wires coming from the solar panel pass thru the transom to the controller via the same hole used for the wires running to the outbaord motor (between the motor bracket mounts.